Solidworks Handy Tip!
So many people I know ask me questions about how Solidworks files are linked to one another. And sometimes I can’t blame them! For a typical user that is used to how computer files work and how programs operate, these users would assume that duplicating one Solidworks assembly would be as simple as copying and pasting the assembly folder and waalaa! Copy Complete! But no, not in Solidworks, it’s never quite that easy. Users often copy and paste the assembly folder and then open the new assembly and to their horror they discover that the assembly is actually linking to all the old part files from the original folder! So how do you get around this? Many people try copying and pasting folders on completely different drives. Others painstakingly use the ‘replace component’ command in the assembly and pray that as they replace each part no errors show up. But how do any of these processes work if you have already done a Solidworks drawing for the assembly…ahhhrrrrrr! I don’t want to redo the 5 hour engineering drawing! But if you haven’t been fortunate enough to discover a way of doing this assembly duplication process with absolute ease, including getting the drawings all linked up properly, please read on!
Article by Martin Gibson – @embody3d @martingibson – 05.08.2010
Duplicating Assemblies Without Causing Reference Nightmares (Pack and Go)
We are all designers, well some of us are CAD draftsmen, but whoever you are, you will need to keep iterations of your CAD Models. Often you might want to make a change to an assembly whilst still keeping the original copy as a reference. Other people/businesses have a file naming convention and when the project reaches the next stage they need to rename all their parts and assemblies to resemble the next stage of the project. For example, during the concept stage parts are called ‘concept#.clientname.partname.sldprt’ or something along those lines, and then when a prototype is made the file is called ‘prototype#.clientname.partname.sldprt’. Also what if you want to send a client, a supplier, or a colleague a Solidworks assembly in a way that you have absolute confidence that when your associate opens the zip folder everything will work and be linked correctly?
There is a simply solution! Use the ‘Pack and Go’ feature! If you are familiar with Adobe Indesigns ‘package’ tool, you will notice it serves the exact same purpose as the ‘Pack and Go’ feature.
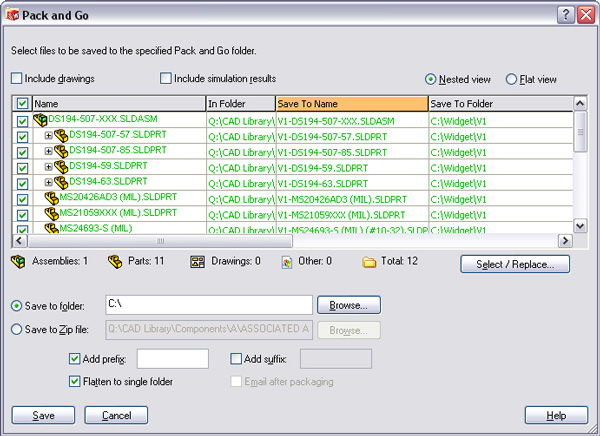
Have your assembly open that you want to duplicate or rename and go to ‘file’ and then ‘pack and go’. The above dialog box will come up which lists a few options. You will see a main dialong box that lists all your parts and assemblies and shows the parent/child relationships. If you want export the drawing please ensure you tick the ‘include drawings’ box and likewise with simulation results. If you want to rename parts or replace certain name file conventions of your files, for example you want to replace ‘concept1’ within your file names to ‘prototype1’ click on the ‘Select/Replace’ button. At the bottom you can choose whether you want to save the assembly in a sub folder or as a zip folder for email purposes. And even further below you can add a prefix or suffix to your fole names as well if you want!
Locking Assembly Parts Down So They Don’t Reference Each Other (Lock All and Unlock All)
Another common issue I come across a lot from people is from people who have issues with their parts being referenced to the dimensions and mates of other parts. When you are designing ‘top down design’ that is, creating parts actually created within the assembly (you know drawing sketches on already complete parts), you are often referencing your new part on the attributes of existing part, so that if you were to change the dimensions of one part it would have implications on all other parts.
Now this process can become an issue if you start moving parts around the assembly and other parts start changing geometry without your permission so to speak. A handy tip is to first make sure that you remove the ‘in-place’ mates and parts that are locked and start mating parts using real mates. What happens if you are creating lets say a live hinge that has two very active parts that are referenced to one another and you want to create an animation of the hinge moving without the geometry going crazy? Well it is as simple as using the lock all and unlock all feature in Solidworks, which can be accessed inside the part file in the feature manager at the very top icon and then if you right hand click this icon it will bring up a menu, and then select ‘List External Refs’. At the bottom of this dialog box you will be able to ‘Break All’, ‘Lock All’ and ‘Unlock All’. Press the ‘Lock All’ button to make component features and sketches locked locally so they don’t get mucked around in assembly mode. And of course the ‘Unlock All’ button will bring your part back to normal so that it will now reference external parts. A very handy tool indeed! It is recommended that you don’t use the ‘Break All’ button. Clicking this button will break all external references and it is undoable. It really is a last resort if you are sick and tired of all the mating and referencing going on in your part and you just want to set it free.
Of course another handy but related tip is to place your cursor over the top of the part icon in the assembly FeatureManager, and then right hand mouse click, and then choose ‘Tree Display’ and then ‘View Mates and Dependencies’ and this will give you a really good overview of all the child and parent relationships in your assemblies and sub assemblies.


6 Comments
[…] This post was mentioned on Twitter by Embody 3D, Embody 3D and Martin Gibson, Martin Gibson. Martin Gibson said: Solidworks Handy Tip! http://goo.gl/fb/Pd5vZ #featured #tutorial […]
Hey there. Just a question for you. If you make a part or assembly, save it as FILE1.sldprt or FILE1.sldasm, then go “file” – “create a drawing from this part/assembly”, it will default to saving the .slddrw file with the same filename as the part or assembly used to create it, FILE1.slddrw. When the part/assy file is open, all you need do is right click on the model space and select “open drawing” and it pulls up the FILE.slddrw. Now, if your internal document naming system requires you to change a drawing’s filename to be FILE1.BLURB.slddrw, this renamed .slddrw file will not open when you right click the FILE1.sldprt or FILE1.sldasm file and select “open drawing”…instead an explorer window pops up for you to find the route to the drawing file. If you then change the drawing file name FILE1.BLURB.slddrw back to FILE1.slddrw, the drawing file is now recognized as belonging to the FILE1.sldprt or FILE1.sldasm file.
So – do you know a way to re-link or re-reference a .sldprt or .sldasm file to a .slddrw file which doesn’t have the exact same filenames?
Thanks -Robert
Hey Robert,
Thanks for commenting…and that’s a real good question.
I don’t know of any precise way of doing this. However this issue shouldn’t be too much of a drama. Because yes if you change the name of your drawing file so it doesn’t match the assembly/part file you wont be able to do the right hand click thing to open it. However if you just open up the drawing file externally using windows explorer the file will open and all the model/assembly references will still be there. It just wont be “hard linked”.
Secondly one thing that would definitely work is if you change the name of your drawing file back so it does match your part/assembly file identically, and then use the above ‘pack and go’ feature you could then change the name of that drawing file only to whatever you want when the toolbox (pictured above) comes up. Then you will have a part/assembly file and a drawing file with different names…but they still will be ‘hard linked’.
I hope that helps…I am with you though, the program needs to become a little more logical when it comes to file management!
Hey, I’m using Solidworks for my disserataion and have come across a problem. I was having trouble with sourcing of files and decided it would be easier if I changed the file names. This has resulted in the files being ‘missing’. When ever I try to open any files, solidworks says they cant be found. Is there any way back from this? I really don’t want to have to start all of my designs again.
Cheers
Ben
Hey Ben,
Could you perhaps give a little bit more information about what has happened…are you working with an assembly here? Why did you change the file names in the first place?
If you have changed the file names and the solidworks assembly can’t find those files anymore I would recommend using the part replacement tool:
http://help.solidworks.com/2011/English/solidworks/sldworks/legacyhelp/sldworks/assem_1/hidd_dve_replace_comps.htm
To relink the parts that you have changed the names for…If you have changed the name of all the parts and the assembly file can’t find anything anymore what you should do is change all the names back to what they originally were so the assembly file will work again. And then use the ‘pack and go’ feature that I have outlined above to rename the parts to whatever you want.
If you don’t remember what the parts were originally called you should be able to find it in the assembly file…that or you just have to rebuild your assembly again.
Cheers,
I managed to figure out what was going on just after I’d messaged you. I’d changed every name file by adding a number on the end, for example (1), in order to try and tidy up the sub folders in my directory. The assemblies couldnt be found after this. But in my panic I didn’t try to open any parts. It turns out the parts were fine, they just needed to be reassembled. Thanks you anyway
Ben